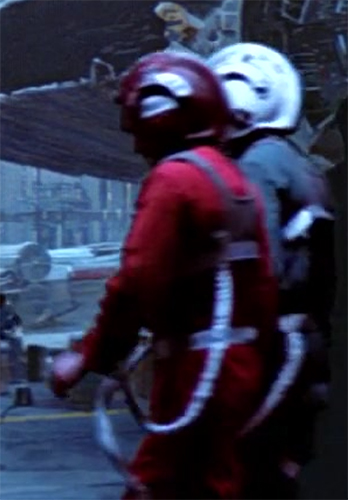
CHARACTER DESCRIPTION
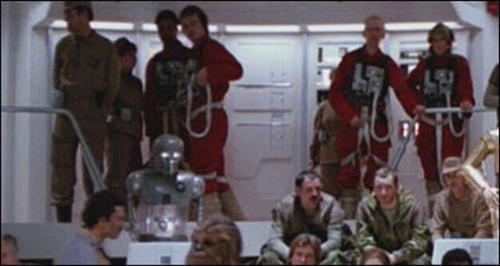
The Rebel Alliance’s starfighter corps was one of its greatest assets. There were nearly as many stories as there were pilots: Rebel starfighters were flown by Imperial defectors, reformed mercenaries, adventure-seeking farmboys, and daredevils who only truly felt alive in a cockpit. Regardless of their backgrounds, Rebel pilots learned to work together, relying on their wingmen as well as their training in countless battles against the Empire. (Source: Star Wars Databank)
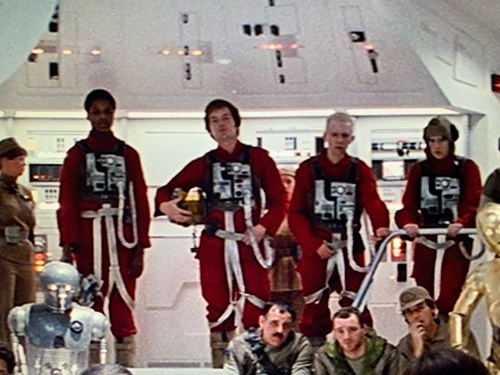
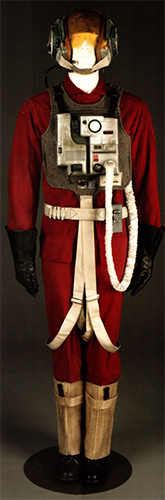
Perhaps the oddest-looking starfighter in the Rebel Alliance fleet, the B-wing fighter is as powerful as it is ungainly. The ship’s structure is almost entirely taken up by its primary airfoil, which houses a cylindrical cockpit on one end, an engine cluster in the center, and a heavy weapons pod at its base. Located just below the engine cluster are a pair of S-foils which can deploy to extend the firing arc of twin laser cannons. The B-wing’s command pod has a unique gyroscopic control system. The pilot can orient it so that it always stays level with a horizon line. No matter which way the B-wing may maneuver laterally, its pilot remains upright. (Source: Star Wars Databank)
Front Image:
https://drive.google.com/file/d/1bxVqnikgG3-95d4r55HSjBEMo6EZF9TD
Source: Star Wars Costumes: The Original Trilogy
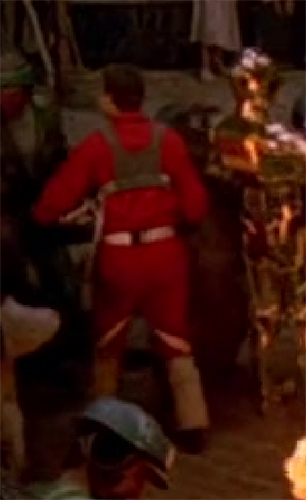
Back/Secondary Image:
https://drive.google.com/file/d/1oRtIZAqLWtYRkopLix5FRhahyUrmJmVb
Source: ROTJ
REQUIRED ITEMS
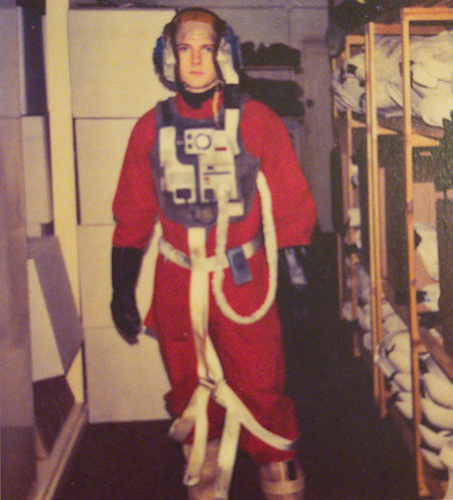
Flight Suit
https://drive.google.com/file/d/1DrVC4KmHnTgwnyURQzwmzar4u9YXdDK8
Source: Star Wars Costumes: The Original Trilogy
Required Details:
• Flight suit is made of Chinese red medium-to-heavy weight matte fabric with no sheen.
• Flight suit has a front zipper that is hidden by a strip or placket of the same material as the flight suit that is approximately 2.5 cm (1″) wide with the opening to the wearer’s left
• Flight suit is devoid of visible zippers or snaps
• Flight suit has a folding style club collar with rounded corners and a rectangular closure tab fitted to the base of the collar, approximately 7.5 cm (3″) wide and 2.5 cm (1″) tall
• Closure tab closes from the wearer’s right to left with the exposed tab extending to the left side of the neck
• Flight suit has a 3-layer, rectangular “pen” pocket with a rounded-off bottom on the outside of the wearer’s upper middle left arm, centered to the shoulder seam with a total of 4 channel openings.
– Bottom base layer has no openings and is approximately 9 cm (3.5″) wide and 13 cm (5.25”) tall
– Middle layer is approximately 6.5 cm (2.5”) wide and 11 cm (4.3”) tall with 2 evenly spaced channels running vertically.
– Top layer is the same width as the middle layer with 2 of the same width channels approximately 2.5 cm (1”) shorter than the middle layer
– The pocket is tilted approximately 20-degrees towards the front
– The pocket layers have a double stitch around the outside edges with stitches that are approximately 4 mm (.15”) apart
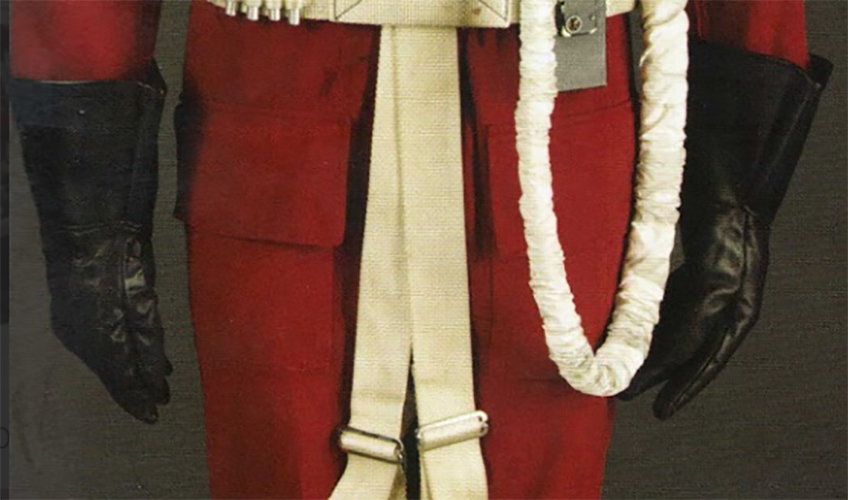
• Flight suit has two middle thigh pockets with rectangular flap closures, one on each leg, positioned and similarly close to the outer side seam of the pant leg. Width is approx. ¾ the width of the pant leg lying flat, height is taller than width by approximately. 2.5 cm (1″)
• The flight suit is devoid of additional pockets
Optional Details:
• There are 2 rectangular shoulder yoke reinforcements, 1 on each shoulder from edge of shoulder to almost the collar.
• There is a trapezoidal application/fake pocket on each side of the chest running from the upper chest to the belt region.
•A trapezoid-shaped reinforcement on the front lower legs that wraps around from the outer & inner seams of the leg, starting at about shin height and extends under the gaiters.
Additional Images:
https://drive.google.com/file/d/13mWGwYFrugSZRSWHK2cvI54r2hOZHI16
Source: Behind the Scenes
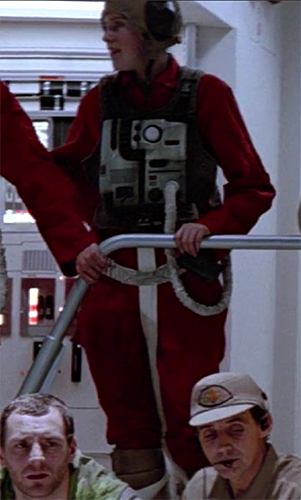
Flak Vest
https://drive.google.com/file/d/1zCKmLzWJpye6ghrWcuKxa_ExwdltJzmU
Source: Star Wars Costumes: The Original Trilogy
Required Details:
Note: All direction descriptions of the chest box are when looking at the box from from the front.
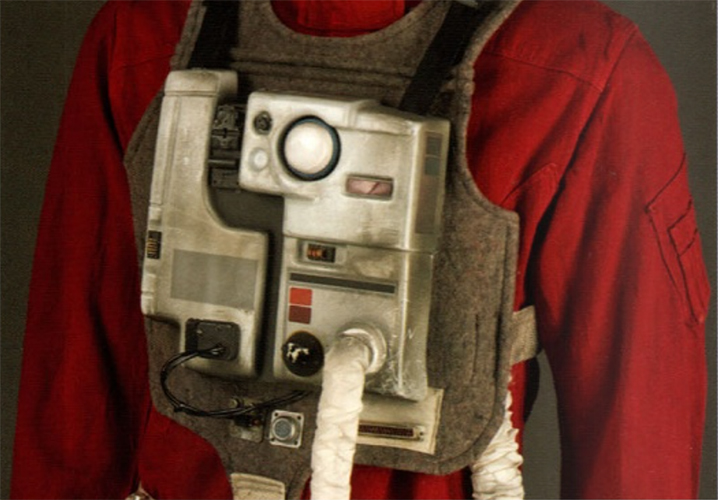
• Flak vest consists of a front and back panel made of a heavy grey felt
• Seamless shoulder straps approximately 5 cm (2″) wide made of the same felt material extend from the front to the back panel.
• Front Panel:
– Panel covers near all of the wearer’s chest
– Panel has a scooped neck and tank-top style cut at the top
– The bottom of the panel has a center scalloped point where the flight harness attaches
– There is black stitching around the perimeter of the panel
– There are 2 horizontal ribs sewn into the panel approximately 2.5 cm ( 1″) below the lowest point of the scoop that extend the width of the panel and sit just above the chest box.
– There is a white WHAT TYPE Material rectangle sewn to the bottom right corner
– There is a long, multi-pin connector greeblie approximately 7.5 cm (3″) wide centered and toward the bottom in the rectangle.
-There is a round multi-pin connector greeblie approximately 2 cm (¾”) in diameter attached to the bottom of the vest just to the right of center.
– There is a greeblie made of a square circuit board, approximately 4×4 cm (1.5 x1.5″) attached to the bottom of the vest just to the left of center.
• Rectangular back panel sits in the middle of the back and covers approximately half the back
• Approximately 5 cm (2″) wide white webbing or canvas material connects the the bottom corners of the back panel and extends to the center sides of the front panel.
• There is a 2.5cm (1″) black plastic side-release buckle “female side” stitched to the top front of each shoulder approximately 5-8 cm (2-3″) from the top line of the shoulder
• The “male” end attaches to the chest box with 2.5 cm (1″) black nylon webbing
Additional Images:
https://drive.google.com/file/d/1bxVqnikgG3-95d4r55HSjBEMo6EZF9TD
Source: Star Wars Costumes: The Original Trilogy
https://drive.google.com/file/d/1oRtIZAqLWtYRkopLix5FRhahyUrmJmVb
Source: ROTJ
https://drive.google.com/file/d/1UvmWTxSszbbLxvLcyUDtZ7nvGVBFFTIj
Source: ROTJ
Chest box
https://drive.google.com/file/d/1zCKmLzWJpye6ghrWcuKxa_ExwdltJzmU
Source: Star Wars Costumes: The Original Trilogy
Required Details:
Note: All direction descriptions of the chest box are when looking at the box from from the front.
• White rectangular box made of a hard, smooth material that is approximately 23×23 cm (9×9″) that matches details in the reference photos.
• There is a black channel that splits the box from left to right
• The left side of the box has a large grey rectangle and a smaller black rectangle
• The right side box has a series of circles and rectangles.
• A length of two small black hoses or thick wires twisted together attach from the back of the box to around the bottom right front to end on a black rectangular greeblie there.
• Chest box has black webbing attached to the back of the box that ends in a black plastic side-release buckle “male side” to secure to the flak vest.
• There is a 2.5-3 cm (1–1.25″) diameter cloth white hose bunched to give a ruffled appearance that has one end attached to the bottom right corner of the box and the other attached to the left side of the wearer’s flight suit at the waist or tucked under the belt.
• Hose falls approximately to the wearer’s mid thigh.
• Other Chest Box configurations will be accepted with a canon reference photo during submission and noted source of the photo
Additional Images:
https://drive.google.com/file/d/15PknxNtAxiERTlir5F3giZSwgs-_uZCT
Source: ROTJ
https://drive.google.com/file/d/1ymGJ4GwlzQsVQOqViClE8fv5dnUWZgtY
Source: ROTJ
Gloves
https://drive.google.com/file/d/1b4QeQcyvE6YMfU_xS2Lt2mpaEDhXFAry/
Source: Source: Star Wars Costumes: The Original Trilogy
Required Details:
• Black gauntlet gloves with leather or leather-like material
• Cuff of the gauntlet has a flared appearance when worn
Additional Images:
https://drive.google.com/file/d/1OwQla4879kBGORjea1K9t9SONdZn55jC
Source: ROTJ
Flight Harness
https://drive.google.com/file/d/15tr9QfGHrdMkBN97HcmMO003mULSMCtw
Source: Source: Star Wars Costumes: The Original Trilogy
Required Details:
• Harness is made of white nylon webbing that is approximately 5 cm (2″) wide
• There are 2 straps that attached to the bottom front of the flak vest
• Each strap ends with the webbing passing through a thin metal 2″ slide buckle to create a leg loop to fit around the wearer’s leg
• Each leg loop sits at approximately the wearer’s knee with the slide buckle & upper part of the straps on the inside of each leg
Additional Images:
https://drive.google.com/file/d/1ojo9dUJgCw6egHOKCaHtdJIRNRW3OJs2
Source: ROTJ
Belt
https://drive.google.com/file/d/1FqzdC2Xype4eHPHjxNaZXkZPrh-ta6r4
Source: Star Wars Costumes: The Original Trilogy
Required Details:
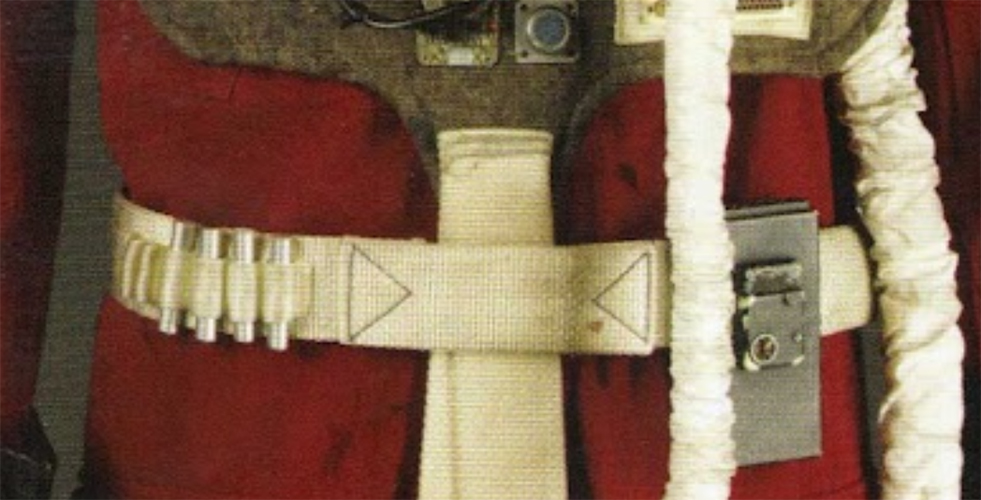
• Belt is made of white nylon webbing that is approximately 5 cm (2″) wide and the same as the harness
• Belt is closed with an approximately 5 cm (2″) black slide-release buckle that is centered on the wearer’s back.
• Centered on the front of the belt is a rectangle of belt material approximately 15cm (6″) wide
– The rectangle has 2 triangles stitched with black thread
– The apex of the triangles face the center of the belt
• The wearer’s right side of the best contains 6 vertical webbing loops for belt flares that are visible when facing front
• Belt is worn over the front harness strap
• Belt sits at the waist
Additional Images:
https://drive.google.com/file/d/1oRtIZAqLWtYRkopLix5FRhahyUrmJmVb
Source: ROTJ
Belt Flares
https://drive.google.com/file/d/1FqzdC2Xype4eHPHjxNaZXkZPrh-ta6r4
Source: Star Wars Costumes: The Original Trilogy
Required Details:
• Metallic, silver appearance cylinders that are approximately 5.5 cm (2.25″) tall and are slightly longer than the width of the belt
• Cylinders are approximately 6.5 mm (¼”) in diameter
• Cylinders are made of metal or other materials that, when finished, have a metallic silver appearance
• Belt may contain a mix of filled and empty slots with 3 to 6 flares
Gaiters
https://drive.google.com/file/d/19dWkMhpzIMrtU0Yyay6kNQ2Yb-L8T9ZU
Source: Star Wars Costumes: The Original Trilogy
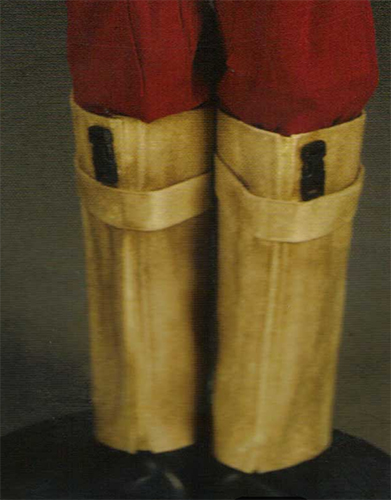
Required Details:
• Gaiters are light tan or pale beige tight-woven, vinyl, or similar material
• Gaiters are approximately 30-35 cm (12-14″) long and proportional to wearer extending from just below the knee to the instep of the boot
• Each gaiter is constructed as one piece that wraps around the leg and comes together in the front with padding that is approximately 1 cm ( 3/8″) on each side of the center gap
• The bottom edges of the gaiter are angled to sit over the top of the boots and approximately 2.5 cm (1″) above the bottom of the heel
• The top of the gaiter is even around the leg
• There is a horizontal strap made from the same material as the gaiters approximately 2.5 cm (1”) wide that wraps around each legging approximately 7.5 cm (3”) from the top edge
• A ¾” black plastic side-release buckle is mounted vertically between the top edge of the gaiter and the horizontal strap. The buckle sits off-center to the outside of the front seam about 2.5 cm (1″) on each gaiter
• Gaiters are devoid of other visible buckles, snaps, or closures
Optional Details:
• Gaiters are heavily weathered
• A metal or metal-like slide buckle mounted on center-back
Boots
https://drive.google.com/file/d/1Ihbvxe1Ql_g9R_CJ-Kag6aZihaNA8nlG
Source: Star Wars Costumes: The Original Trilogy
Required Details:
• Leather or leather-like pull-on style “Engineer” or “Jack” style boots
• Boots are largely unadorned with no visible embossed or painted branding
• Boots have a wide rounded toe in the style of a military Jack boot
• Boots have low heels, approximately 2.5 cm (1″) tall
• Boots are devoid of visible laces, buckles, straps, or other ornamentation
• Boots are devoid of visible front and outside zippers or other large vertical seams
• Calf of boots are covered fully by the gaiters
OPTIONAL ITEMS
Flight Cap
https://drive.google.com/file/d/15PknxNtAxiERTlir5F3giZSwgs-_uZCT
Source: ROTJ
Required Details:
• Flight cap is made from tan tan twill, cotton, or similar cloth material in the style of an ANH-15 flight cap.
• There are black rubber ear cups
• Four black snaps sit vertically along the cheek line.
• The cap closes with a chin strap that is approximately 13mm (½”) wide
Additional Images:
https://drive.google.com/file/d/12nHilZToMElb-bwLFl-actit4Rgpvdhf
Source: ROTJ
Helmet
Option1 – B-wing Style
https://drive.google.com/file/d/1Ib1LvfNzXEhW2BLNH7aTJVYT_sqArRkM
Source: Star Wars Costumes: The Original Trilogy
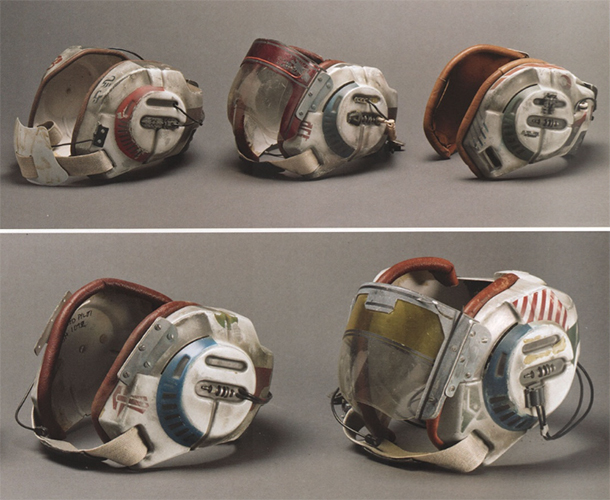
Required Details:
• Rebel B-wing flight helmet matching the shape and style of reference photos.
• The base wraps around the sides and back of head with a cut out on the crown of the head.
Optional Details:
• Helmet has a face shield
• There is a wire mic attached to either side.
Option 2 – X-wing Style
https://drive.google.com/file/d/1UvmWTxSszbbLxvLcyUDtZ7nvGVBFFTIj/view
Source: ROTJ
Required Details:
• X-Wing style helmet matching the shape and style of reference photos.
• Helmet has a Mohawk design and raised side panels
• Mohawk has a trapezoidal cap on the front with universe related design
• Helmet has an amber translucent visor lens covering the eyes this is fixed or movable
• Helmet has a white chin cup held in place with a black elastic strap that is threaded through the chin cup and secured to the inside of the helmet
• Helmet has black weather stripping around the “ears” and neck borders
• Helmet is void of visible buttons or covers that are not present in reference photos
• Helmet style, décor, pinstriping, and paint scheme fits in the Star Wars universe
• Helmet is void of modern-world or other sci-fi-fantasy genre images
• Helmet is proportional to the wearer
Optional Details:
• Helmet has a solid gray or white boom mic shaft with a black mic
• Helmet has dark tan earcups
Note: Helmet must be approved prior to use at any Rebel Legion event
Belt Box
https://drive.google.com/file/d/1fJ4AyB3–N1p3ziJGwPHsTVpS1O9MS9a
Source: Star Wars Costumes: The Original Trilogy

• A black, rectangular box clipped to the wearer’s left side of the belt
• Box is approximately 12.5 cm (5″) tall, 6.5 cm (2.5″) wide, and 2.5 cm (1″) deep
• There is a raised rectangular section approximately half the length and width of the box that is aligned toward the top of the box.
• There is a small white or red rectangle on the wear’s right side of the box.
• Alternate belt boxes will be accepted with a reference photo during submission with noted source of the photo.
COSTUME RESOURCES:
Reference Gallery & Other Guides
ADDITIONAL NOTES:
• If you would like to add a helmet after official approval, email links with your photos hosted on an external site including all 4 sides of your helmet to [email protected]
• This version of pilots are not seen with blasters or holsters so they are not part of the official standard. These items should not be submitted with your application and will require photos without these items for roster photo and to clearly view all costume parts. Blasters and holsters are not authorized when trooping with this costume.
For Face Characters: Tattoos and body piercings – No tattoos or body piercings may be visible unless it is a tattoo/piercing the character has. They must be covered with makeup or by the costume.
PLEASE NOTE: The costume standards are a guide, yet are not an all inclusive outline of required elements. The judges will be looking for quality of workmanship, accurate execution and use of materials in addition to these general standards check lists. If you have a question about fabrics, colors, and parts choices for your build please contact the LCJs for your category about parts/materials you are considering before you start your build.
_________________
RLSC Info
RLSC Instagram
RLSC Public Facebook
RLSC Members Facebook
RLSC Website
