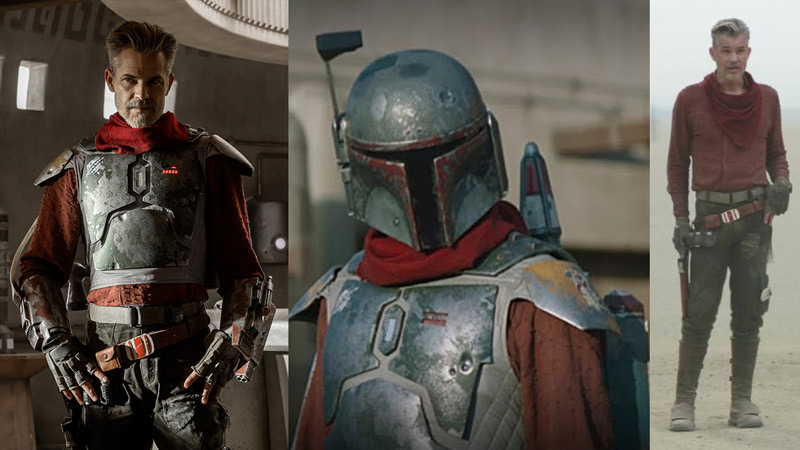
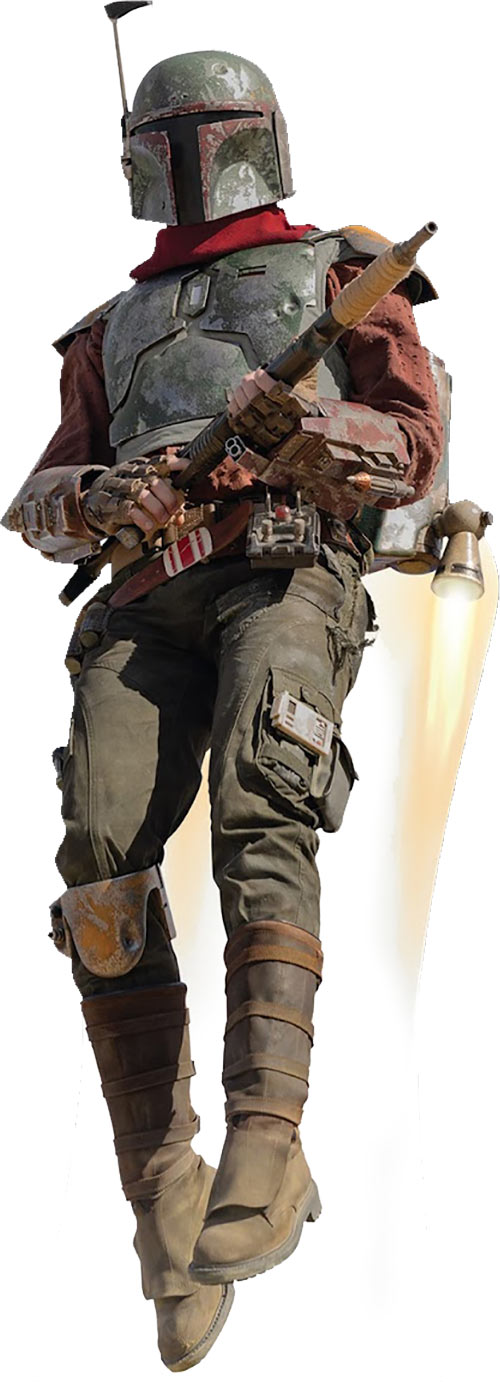
CHARACTER DESCRIPTION
The marshal of Mos Pelgo, a small town on Tatooine, Cobb Vanth has earned the trust of the townsfolk as a capable peacekeeper and leader. Vanth, at one time, was custodian of Boba Fett’s Mandalorian armor, which he bought off of Jawa traders. (Source: Star Wars Databank)
Full reference album: https://photos.app.goo.gl/23xKbRqm6nL9uvVW8
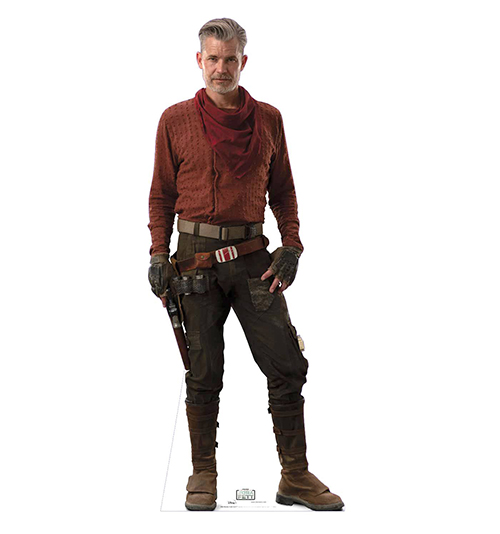
Front – Non-armor (The Book of Boba Fett)
https://photos.app.goo.gl/WHSdc29ZdZEmQKkXA
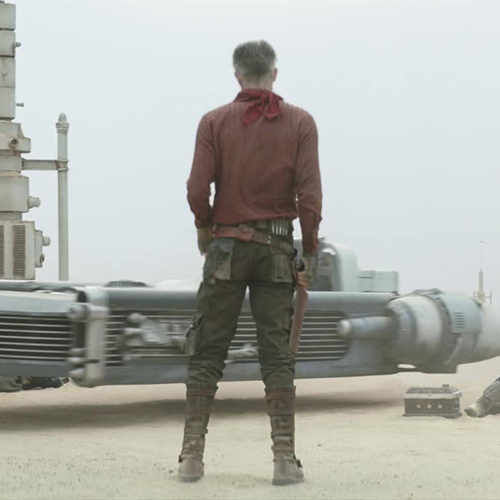
Back – Non-armor (The Book of Boba Fett)
https://photos.app.goo.gl/9EokjPbbhdDhv6sr7
REQUIRED ITEMS
Book of Boba Fett:
Shirt

https://photos.app.goo.gl/aM6Ryu741kmAqtNS6
Required Details:
1. Shirt is a brick red colored long sleeved shirt made of a Swiss dot or or distressed “Frontier Dot” or “Dobby Dot” style fabric with dots proportionate to reference photos. Dot fabric must be a light to medium tight weave with a brushed or “pre-washed” soft worn look. No thick fabrics, dot brocades, additional textures, etc.
2. Long-sleeved oversized fitting shirt with a standing collar approximately 1.5 – 2″ (3.8 – 5cm) tall that ends just past the shoulder seam. Top edges are rounded. Closed, the shirt is similar to a standing collar of the late 1800s – old western Floyd “side-button” shirt with a vertical cut on the outer flap. Shirt has loose fitting sleeves, is tucked in front, and has slight blousing in back.
4. Sleeves are billowed and pleated into an elongated cuff that extends roughly half of the distance to the elbow. Sleeves close at the wrist with a 4 – 5” (10 – 12cm) cuff (proportional to costumer’s build) that has 3 closures (each closure is 1” / 2.5cm apart).
5. The shirt has a solid back with no back yoke. Shirt crosses left over right and has no visible closures. Hidden snaps recommended.
6. When shirt is worn by itself, front panel hangs down to form a triangle shaped flap.
Optional Details:
1. Shirt is self-lined.
Additional Images:
https://photos.app.goo.gl/mDJEoaDHgfQMpyLWA
Shirt reference album: https://photos.app.goo.gl/7qbVKx8pUApACDQd8
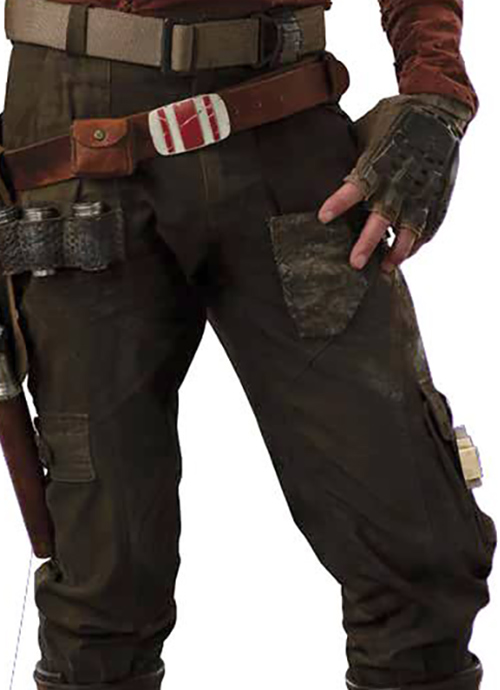
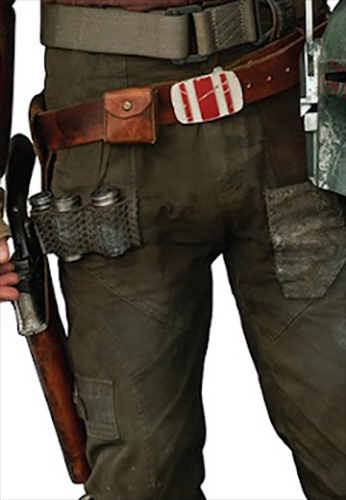
Pants
https://photos.app.goo.gl/sbvCVnxFqqrY5H5K7
Required details:
1. Multi-pocket cargo pants that are military olive drab green in color. Distinctive features include uniquely shaped rear pocket flaps, unique side pockets with straps and a metal ring. (Free Knight Men’s Combat Tactical Multi-Pocket Outdoor Trousers Army Cargo Pants recommended.)
2. Pants are made of a cargo or other similar medium to heavy weight material.
3. Pants have two curved seams that start on the outer seam and curve at midthigh and then down to the ankle. This curved seam is mirrored on both sides on the back of the pant leg. All seams are top stitched.
4. Pants have a roughly 2” (5 cm) waistband that has 4 belt loops. Pants close with a zipper fly and button closure. There is a larger belt loop added to the waistband on the upper left-hand side to help hold the holster belt up.
5. Pants are long enough to tuck into boots with slight bunching above the boots.
6. Multiple patches have been added to the front left pocket, left side, and both rear pockets. Patches are roughly sewn, thick stitching, as if patched over the years. Front left lower pocket is mottled in appearance, with no discernible pattern, and looks loosely paint-weathered with no distinct hard color contrasts. The stitches used are large “X” stitches. Front left upper pocket is brown, suede-like in appearance. Left hip has a longer vertical patch that is frayed at the bottom.
7. The front left hip slant pocket is a large, rectangular, brown, weathered patch, with a suede-like in appearance, that extends from the waistband down to just below the original end of the pocket and from about 3 – 3.5″ (7.5-9 cm) from the edge of the fly to about .75″ (2 cm) from the side seam. The outer seam on this patch has torn free about 1/2 of the way up and angles over exposing the back side of the patch and the finished edge.
8. A patch overlaps the brown patch at the lower inside corner. It is mitered on the outside lower corner. It extends down from the approximately 1″ (2.5 cm) above of the zipper down so that the mitered corner meets and overlays the uppermost angled top seam. It extends from roughly 1.5″ (38 mm) from the edge of the fly to just about the first belt loop. This patch appears to be made from a similar fabric as the rest of the pants but is heavily weathered.
9. There is a long rectangular strip of fabric, made of the same or very similar material as the pants, that covers the side seam. This patch sits beneath both the brown patch and the outermost seat patch. It extends down from about the top of the back pocket to the curved top seam This patch is heavily frayed at the bottom. The brown patch overlays this patch by about .5″ (13 mm) and it extends to about the back outside belt loop.
10. The back patches are constructed from 3 separate pieces of fabric that almost resemble a makeshift back pocket. The outermost and longest piece is a rectangle that overlays the side patch and extends from the outside of the belt loop to just over halfway to the former location of the back pocket. And from the top of the former pocket to about .75″ to 1″ (18-25 mm) below the lower edge of the former pocket. The second piece extends from the inside edge of the first patch to just past the inner edge of the former pocket and from the top of the former pocket and down to bottom of the former pocket. The third piece serves as kind of a flap. It lays across the top of the other two pieces, extending the combined width and down about 40% the length of the innermost piece. It is secured along the top, with the bottom unsecured. These pieces are similarly weathered to the mitered front patch.
11. Left leg side pocket includes a single closure leather-like pouch that is dusty black (hiding any existing zipper pockets). Also included there is a Data Tag, a rectangle, with details on different levels. Dirty white to very light gray with a red button and dark gray inset rectangle with a small repeated hole pattern. Main rectangle is approximately 3.5” (9 cm) long, 2” (5 cm) wide, and .375” (1 cm) high, with an additional .5” (approx. 1.25cm) width of details.
12. Right upper front pocket has a dark woven mesh material that looks like leather attached to the bottom edge of the right front pocket to hold three aluminum (or similarly looking) cylinders.
13. Rear right pocket looks to be patched with the reverse side of a woven fabric creating a raised texture pattern.
14. Rear left pocket is an uneven shape with light tan weathering on the right with darker weathering in the middle and left.
Optional Details:
1. The three silver cylinders in the right upper front pocket have solid aluminum (or similar) bases. They also have caps with 8 levels of circular detail of varying diameters.
2. The weather on woven mesh on the right upper front pocket may include blue paint.
Additional Images:
https://photos.app.goo.gl/Wphcm6CSH5sSqrqUA
Pants reference image album: https://photos.app.goo.gl/bkpATZUVuJNZx7Jv5
Holster Belt
https://photos.app.goo.gl/k1kBbdkf5SmZ2DM7A
Required Details:
1. Belt and holster are made of leather or leather like material.
2. Holster belt is approximately 1.5” (3.8 cm) wide and is reddish brown.
3. The holster belt is slung very low on the right side, usually going under the rear right pants pocket flap. Directionally, it wraps from the buckle around the left hip (non-blaster side) and comes around the right hip back to the front.
4. The holster belt has additional notches (holes) visible beyond the hole used by the buckle. Holster belt may be adjusted as needed.
5. Belt buckle is white with raised red stripes signifying a Marshal badge. The overall buckle shape is like a rounded rectangle with the long and short edges also bowing outward. The raised stripes taper in relief near the edges of the buckle. Weathered scratches in the red areas are to be white to match the majority of the buckle per reference. Approximate proportions of red stripes versus white, using one of the thin vertical red stripes as 1 unit of measure for width: 2 white / 1 red / 1.75 white / 3 red / 1.75 white / 1 red / 2 white.
6. The buckle itself is approximately 8 widths of the thin stripe turned horizontally high. Based on the belt width the buckle is approximately 3.125” (8 cm) wide and 1.875” (4.75 cm) high.
7. Front pouch is the same color as the holster belt. It is approximately one finger width away from the buckle toward the blaster side. It has a brass chamfered Chicago screw (or similar) closure. The middle third of the flap is somewhat straight cut with the outer thirds being 45 degree angles, rounded corners (not sharp cuts). The side panels of the pouches have exposed raw edges facing front.
8. Rear pouch – same size and style as the front pouch, Located to the right of rear left pocket, left of center overall.
9. Computer heat sink or similar part (Micro Connectors – M.2 2280 SDD Heat Sink Kit recommended). It is approximately 2.75” (7 cm) long, .875” (2 cm) wide, and .375” (1 cm) high. The outer faces must be sanded to the bare aluminum (or aluminum-looking) surface. The heat sink is placed on the right side of the holster belt, approximately half its own length away from the holster. The greeblie is lightly weathered.
10. Chamfered brass Chicago screws (or similar) decorate the belt. One pair of two screws, one above the other, are equidistant between the rear pouch and the heat sink part. A second pair is the same distance on the opposite side of the rear pouch. A third pair is used to hold on the buckle, usually hidden by the additional belt material.
11. Holster belt has an aluminum/aluminum-like part on the left hip. It has a flat, square base with chamfered corners and four screw points. A cylinder rises up from that base with a smaller cylinder rising up from that. It is secured with set screws.
Optional Details:
1. Pouches have no visible stitching; the sides are likely glued in place.
2. The Chamfered brass Chicago screws decorating the belt are smooth and do not have a flat-head screwdriver slot.
Note: The Book of Boba Fett version has some more weathering, the stitching changed from dark to light and also two lines of stitching on the pouch side panels were added compared to first appearance.
Additional images:
Holster reference album: https://photos.app.goo.gl/pVnrMXxzpYhczREEA
Belt

https://photos.app.goo.gl/YLFJZQiw4AFTinCq5
Required Details:
1. A tan (Coyote Tan, similar greenish tan like the gloves) rigger belt is worn through the belt loops on the pants. This belt has tan Velcro and webbing and is roughly 1.75” (4.5 cm) wide (Condor Rigger Belt, Coyote Tan recommended).
2. The belt closes on the blaster side not as normally intended with Velcro on the left side.
3. The belt is similar to a rigger’s belt with a silver square buckle and triangular buckle.
4. The main part of the belt passes through the buckle, pulling the buckle locking bar to the right and covering it as it passes across to attach with Velcro. The belt does not go back through the buckle on the other side of the locking bar.
5. To the side of the triangular metal “v-ring” where the triangle narrows, there is an added black ratchet strap around the entire belt.
6. Worn to the left of the main buckle is a black, ridged plastic or plastic-like strap. On the back right of the belt is an olive green dart pouch made of canvas or a similar material. The pouch holds five vertical, thin mostly cylindrical objects, aluminum in appearance. They are attached to the belt in a fabric bandolier-style.
Additional Images:
https://photos.app.goo.gl/LSXTb3jT81nawfs88
Belt reference album: https://photos.app.goo.gl/8Pihq8HcxgVK11UT9
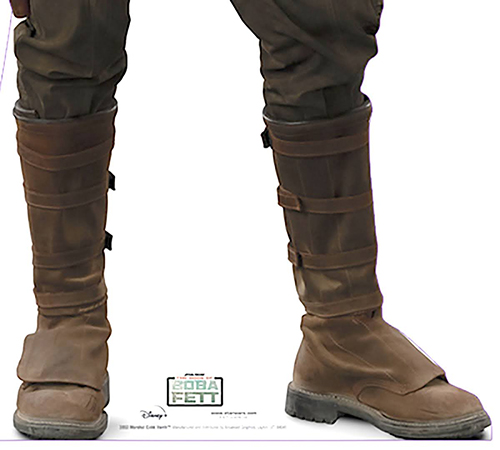
Boots
https://photos.app.goo.gl/2m3UPQ4v68Dsa1Tx5
Required Details:
1. Boots are medium to light brown leather (or leather-like) in appearance.
2. Boots may be a single integrated boot/spat as seen in the show, or boot with separate spat (see below for spat description).
3. The toe box is scuffed and weathered.
4. Boot height is just below the knee.
5. No visible laces or zippers. A hidden zipper or subtle zipper on the inside of the leg is allowed.
6. Boots are weathered. The boots get more sandy and dusty the closer they get to the foot.
Optional Items:
1. Boots have dark soles with a tread inset around the edge.
2. Boot has a rear center panel, wider on the heel thinning to an even strip continuing up the spat. There is topstitching on either side of it.
Additional Images:
https://photos.app.goo.gl/ykqtEFfR3SUMS98LA
Boots reference album: https://photos.app.goo.gl/Q9zZa2NCJKztCpgR6
Spats
https://photos.app.goo.gl/fD6xi7JXJXt8JJ7v9
Required Details:
1. Spats are made with a leather or leather-like material. Spats are a medium to light brown in color, matching the boot.
2. Spats are held in place with four roughly 1” (2.5 cm) wide straps evenly placed. The straps have a row of light tan/beige top stitching all the way around. Straps are long enough to wrap around the leg of the costumer and extend slightly past to the opposite side. The rear of spat has a center strip of leather with top stitching on both sides to the top. The strip looks as if it integrates with the rear center strip on the boot. Attached to the front of the spat is a flap. Spats may be attached to the boot or worn not attached.
3. Spats are weathered.
4. At the top of each spat is black piping.
5. Foot cover flap is secured on the inner part of the foot and down onto the top of the boot, not folding up or free floating. When integrated with the boot, the flap starts as the inner rear panel of the boot and is sewn to the front inner corner of the boot. The foot cover hides the laces and related structure, but still shows the top of the boot.
Optional Details:
1. There are two topstitched lines on the panel under the straps that curve at the ankle and extend back up to the knee.
2. The flap attached to the front of the spat has topstitching that continues from the front topstitched portion and back up.
3. There is a top ring of stitching around the top of each spat. The main body of each spat has vertical stitching that runs from the top ring almost down to the foot cover, curving in toward the center and back up. The same shape is also on the opposite side of the leg.
Additional images:
https://photos.app.goo.gl/jKFvxmxZaxyJ9jN76
Boots reference album: https://photos.app.goo.gl/Q9zZa2NCJKztCpgR6
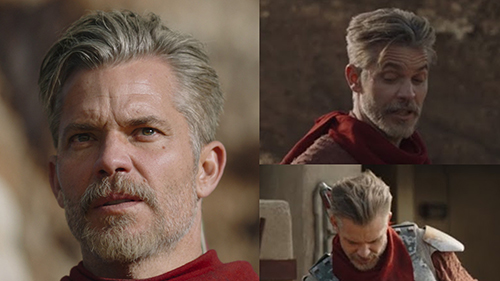
Hair/Facial Hair/Scar
https://photos.app.goo.gl/1FEyPuVur7gdTQeu6
Required Details:
1. Hair is salt-and-pepper gray in color. Hair is longer in front and shorter and cropped close to the head in the back. Hair does not have a hard line part. It may be worn back with a loose center part, swept to the side with essentially no part, or with a slightly off-center loose part.
2. Costumer has stubble or resemblance of stubble around face. Facial hair is salt and pepper gray, longer on upper lip and chin, shorter and lighter elsewhere. There is a slight part in center of mustache area. Facial hair has natural edges, not a cleanly groomed edge.
3. Natural occurring hair colors only.
4. Cobb has a facial scar on the right temple, starting next to the right eye, going horizontal until mid-temple, then vertical in front of sideburn, then mostly horizontal starting at the height of where the front of the ear connects, gradually going higher into the sideburn just above the ear.
Optional Details:
1. On most clippers, the beard trimmer guards are: 3 for chin, 1 for sides, blending into no guard, longest setting on cheeks. Chin blends to neck from 3, 2, then 1. Mustache is longer, scissor trimmed.
Note: If a wig or fake facial hair is worn, it must look like real hair.
In the Book of Boba Fett, he has a shorter cut and shorter beard overall, but it is essentially similar to appearance in The Mandalorian.
Additional Images:
https://photos.app.goo.gl/qUezbsCVKfER8C6z8
https://photos.app.goo.gl/vKEjtWRF6MndnRhy5
Hair/Facial Hair/Scar reference album: https://photos.app.goo.gl/DUw3BSX4F5pUWR1m8
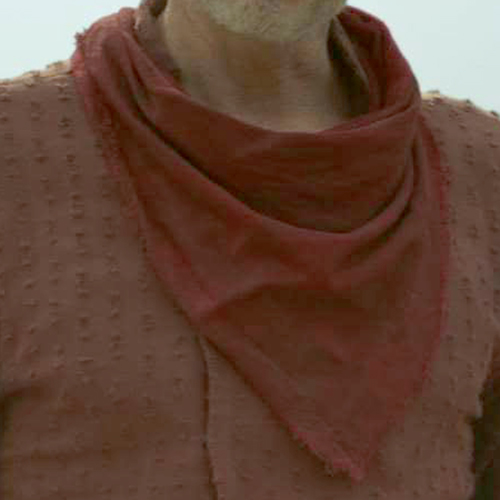
Scarf/Bandana
https://photos.app.goo.gl/DxoVznjk3LNjiVBk6
Required Details:
1. Scarf is made of a linen or linen type fabric with a similar weave (thick enough to have folds, but not minor wrinkles).
2. Scarf is a darker, deeper red than the shirt.
3. Scarf has unraveled/loose ends and is not hemmed. It has some weathering and fraying of edges.
4. Scarf is large enough to cover the top half of the chest, coming to a point in front and ties in back in a knot.
Note: Not used if going for flashback escape/desert wandering sequence. It has shorter ends in The Book of Boba Fett and longer ends after armor removal in The Mandalorian S2, E1.
Additional Images:
https://photos.app.goo.gl/EqkuhfRkMGWXwWfU6
Scarf/Bandana reference album: https://photos.app.goo.gl/zFeBxMM371yZZoN69
Gloves
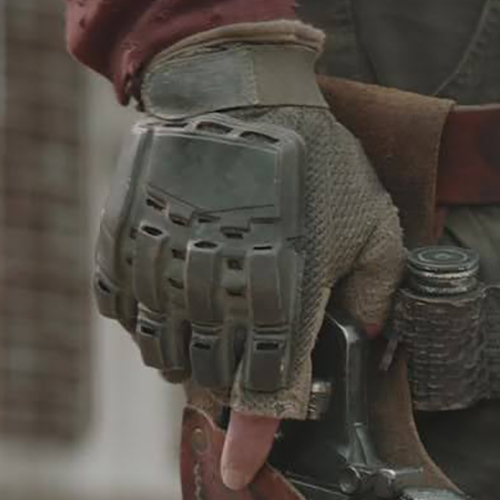
https://photos.app.goo.gl/xd1VutuPF2HvWqQq9
Required Details:
1. Half-finger tactical gloves (typical style for airsoft or paintball use; Tan – Matrix Half Finger Tactical Gloves recommended)
2. Base color is tan, but a somewhat greenish tan. Palm is a thin suede. The back of the gloves are a synthetic tight weave mesh material.
3. The gloves close with a Velcro strap at the wrist.
4. A flexible, rubbery plastic guard with varying geometric shapes, levels and holes is on the upper, front facing part of the glove.
4. Weathering includes dark discoloration and some minor fraying.
5. Logo, [color=blue]if present, is covered with black leather or leather-like material with light stitching around the edge.
Optional Details:
1. Palm has light tan double stitch lines from the index base knuckle to pinky base knuckle, down to the heel of the palm and across to the thumb. Also a single inner stitch line roughly 1 cm (3/8″-1/2″) in from the double.
Note: Gloves are not used in flashbacks in the desert or when returning the armor to Din Djarin, but they are used without armor in The Book of Boba Fett.
Additional Images:
https://photos.app.goo.gl/N2J1g1M1vuadhKNp9
Gloves reference album: https://photos.app.goo.gl/Sf88oXkxmwkCNYF48
OPTIONAL ITEMS
HF-94 Heavy Blaster Pistol
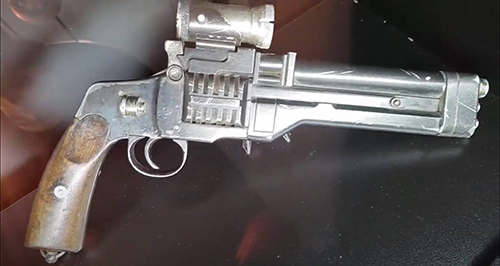
https://photos.app.goo.gl/hqMMgepeeQEwvwb66
Required Details:
1. Blaster is based on a German WWI Model 1894 Hebel Flare Pistol with hammer and breach opening lever removed.
2. Grips are wooden in appearance, Lanyard ring is present at the bottom of the grip.
Additional Images:
Blaster pistol reference album: https://photos.app.goo.gl/unWPPX195xCUguT9A
Armored version from The Mandalorian, S2 EP1:
Front – Armored (The Mandalorian, S2, EP1)
https://photos.app.goo.gl/WHSdc29ZdZEmQKkXA
Back – Armored (The Mandalorian, S2, EP1)
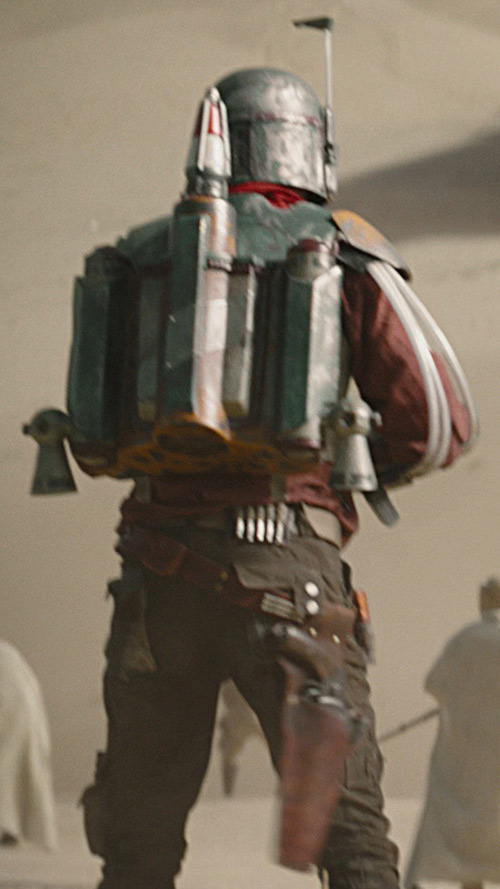
https://photos.app.goo.gl/14Evrep4RfbhrwnK8
Required Items:
Shirt
Scarf/Bandana (When worn with armor, ends are tucked into the armor and the front is folded to not obstruct the chest armor detail.)
Gloves
Pants
Holster Belt
Holster
Belt
Boots
Spats
Flak vest (see below)
Helmet (see below)
Armor (see below)
Gauntlets (see below)
Jet pack (see below)
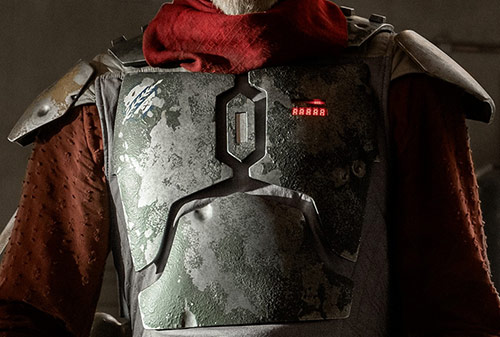
Flak Vest
https://photos.app.goo.gl/ERPzMQDpuvKVzxDc9
Required Details:
1. Flak Vest is made with light gray matte/non-shiny ironing board or similar fabric (polyester, twill, or similar) that has light to medium weathering.
2. Flak vest has a high neck, sleeveless shirt style cut that extends to the costumer’s natural waist with visible shirt material between the flak vest and rigger belt.
3. Flak Vest closes vertically down the middle of the back with closure hidden by the armor and jetpack.
4. Each shoulder has a quilted shoulder tab extending a few inches down the wearer’s arm to attach shoulder armor.
5. Flak Vest has uneven stitching detail that runs vertically at an angle to create V shaped patterns on the front and sides of the vest.
6. There is a vertical seam on each side under the wearer’s arm.
Optional Details:
1. Flak Vest closes down the middle of the back with a zipper.
Additional Images:
Flak vest reference album: https://photos.app.goo.gl/usid6DPpmHXiZrV49
Helmet
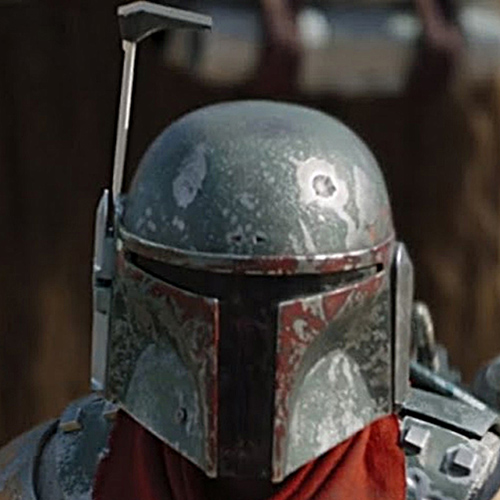
https://photos.app.goo.gl/a56gVAyPZBgEabFC6
Required Details:
1. Helmet is a dome shaped Mandalorian helmet that is a matte medium/dark olive green color. The helmet’s width should not greatly fall short of or exceed 1/2 the width of the wearer’s shoulders measured from armored shoulder plate to armored shoulder plate.
2. The wearer’s front left side of the dome has a prominent dent approximately 2.5 cm (1″) in diameter that is a silver metallic color and appears as if the paint has been chipped and weathered around it.
3. Mandibles, brow, and rear band are matte dark red.
4. Upper cheeks are a shade darker than the rest of the front of the helmet with blue-green color.
5. The wearer’s right cheek has a weathered silver “Diagnostic Port” that is a small circular greeblie with 3 holes similar to a 3-hole Borden connector and partly covered in green matching the lower cheek
6. There are two turn signal-style triangles pointing outward centered above the front brow. The right turn signal is medium red and the left is navy blue.
7. Helmet ears and back key slots are a weathered silver metallic color.
8. Rangefinder assembly attached to the wearer’s right side. Rangefinder stalk is a weathered silver metallic color and noticeably cleaner than the helmet ears and key slots. Range finder topper is black with two small parallel holes on the right side for two bumps giving the appearance of two red led lights. The underside of the rangefinder is set fairly deep into the topper and is silver. A small viewfinder painted black is attached to the underside of the block.
9. Helmet has a dark colored, full one piece “T” visor that hides all facial features.
10. There are 18 dark yellow-orange killstripes on the wearer’s left side of the helmet dome above the brow that are heavily weathered; some are barely visible.
11. Helmet back panels are a matte medium green with heavy weathering and acid bubbling of the painted surface.
12. There are 6 silver gray key slots in a rectangular recessed area running vertically at the back of the head.
13. There is a visible appearance of a circuit board behind the key slots (resembling a MQ-1 calculator piece or replica) where the bottom two key slots have a small weathered red cylinder knob protruding.
14. Helmet has significant paint chipping and weathering matching reference photos.
Optional Details:
1. Red blinking LEDs in rangefinder.
2. Servo controlled rangefinder that raises and lowers without touching the helmet.
Additional Images:
Helmet reference album: https://photos.app.goo.gl/quFAzuHswKqkB7pv8
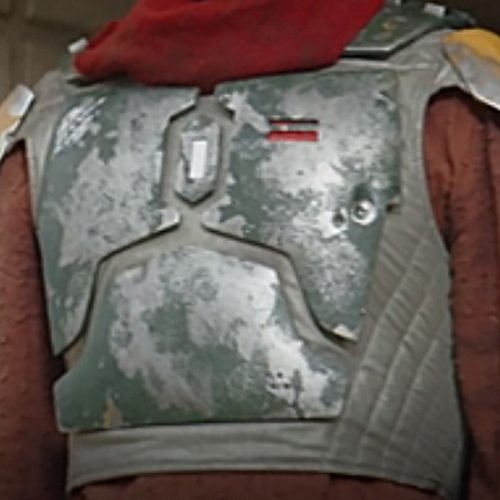
Armor
https://photos.app.goo.gl/VMgUTyS79W3peucKA
Required Items:
1. Armor consists of collar, right and left chest plates, ab plate, center diamond, back armor, shoulder plates, and knee armor.
2. Armor is approximately 3 mm (1/9″) thick with squared, hard edges.
3. Armor is painted a matte medium green with lots of weathered silver “metal” showing beneath the paint, looking like damage.
4. Wearer’s left chest plate has two cut-out horizontal bars on the upper portion of the plate with the upper bar being thinner than the bottom bar. There are a series of dents on the upper left corner and two dents on the left side middle of the wearer’s left chest plate. Must be of adequate size in proportion to the chest area of the wearer. Chest plates do not exceed 2.5 cm (1”) beyond the outside edge of the collar, at maximum.
5. Right chest plate has a weathered “Jaster’s Crest” sigil in the wearer’s upper right corner and is devoid of dents. Must be of adequate size in proportion to the chest area of the wearer. Chest plates do not exceed 2.5 cm (1”) beyond the outside edge of the collar, at maximum.
6. Collar armor consists of two curved trapezoidal plates (front and back), that have a seam between them across the top of the shoulders. Collar armor extends from the neck to just past the shoulder seam of the flack vest and to roughly the bottom edge of the wearer’s sternum. Collar armor abuts to the backplate. Collar armor has two silver rectangular studs at the top edge on each side of the plate toward the top of the shoulders.
7. Ab plate is a 9-sided ab plate. It has two dents on the top and bottom of the wearer’s right side. There are 3 small closely spaced holes on the left in an equilateral triangle pattern with the single dot at the top. Abdomen plate is proportionally sized to the chest plates.
8. Ab plate triangle pattern holes expose the flak vest beneath, but no attachment hardware is visible.
9. There is a center diamond between chest plates that is the same color as the armor and has a rectangular silver insert in the center.
10. Collar, right, and left chest plates, ab plate, and center diamond attach securely to the front of the vest with moderate spacing between the pieces. Must be fitted and spaced consistently, depending on body type. Maximum spacing should equal no more than 2.5 cm (1”) between the collar/chest/abdomen plates and no more than 12 mm (½”) between the diamond and chest plates.
11. The ab plate sits 2.5-5 cm (1-2″) above the bottom edge of the flak vest.
12. Back armor covers approximately 3/4 the overall width and length of the back. Back armor has a rectangular hole cut out for the jetpack attachment. Back armor extends to the collar armor. Back armor extends to the bottom or just past the bottom of the flak vest. There is a round dent on the wearer’s lower right of back armor, on the second angled section from the outer edge.
13. Shoulder plates have six points and curve around the wearer’s deltoid muscle. Shoulders are painted golden yellow and significantly weathered with exposed silver underneath.
14. Wearer’s left shoulder plate features the ROTJ variant of the mythosaur sigil, in a medium red backed by an off-white background.
15. There are dents on the wearer’s right shoulder plate with a large crater on the upper left side along the edge and a smaller crater on the lower right side of the plate.
16. A single knee plate is worn on the wearer’s right knee and attached with black or other dark elastic. Knee plate has a straight horizontal top edge with a roughly parabolic curve shape down over the kneecap. When standing, right leg armor can overlap the top of the boot. Knee armor is weathered yellow-orange with pitting. The outside of the knee armor has two greeblies stacked vertically, a cylindrical dart launcher on the bottom and a tapered metal cone on top. Knee armor has a prominent dent on the inside portion of the plate.
Optional Items:
1. The horizontal bars on the left chest plate are backed by an illuminated red, flashing display.
2. Back armor has a half circle cutout at the base.
Additional Images:
Armor reference album: https://photos.app.goo.gl/EWd83kzRBTKNhamV7
Gauntlets
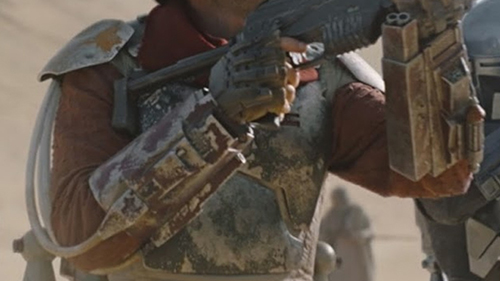
https://photos.app.goo.gl/u8Yavsqq9EcFfevE8
Required Items:
1. Gauntlets are deep burgundy clam shell style devoid of visible closures that are heavily weathered to expose a base silver color with extensive pitting.
2. Gauntlets are made of a rigid material similar to the armor and sit on the forearm extending from the wrist to a few inches below the elbow.
Right gauntlet:
1. Four small silver darts are mounted at the top front of the gauntlet.
2. Front section under the darts has a smooth indentation on the inner side.
3. A silver and weathered ovular detail protrudes from a rectangular section, inboard side, above the darts.
4. A black rectangular detail is present towards the top-rear of the gauntlet, in front of the plug block, heavily weathered.
5. A whipcord housing is mounted to the outside of the arm, matching show reference, with a hole at the wrist end.
One hose connector, matching show reference, is attached to the back of this whipcord housing.
6. A second hose connector, matching show reference, is attached to a rod that is mounted directly under the whipcord housing.
7. Hose connectors are in the opposite direction than as done on Boba Fett in the films – apparently when you buy something off of Jawas, it doesn’t come with a manual.
8. Vinyl reinforced tubing with a cross-hatch thread pattern is cleanly attached to the back of the plug block and extends up under the flak vest, behind the shoulder.
9. Any padding used must not be visible.
10. If switches are used, they are push-button style, not toggle switches.
11. Reinforced vinyl tubing (3) from the right gauntlet is exposed, leading up under the rear of the right shoulder. Two from the side of the gauntlet, one from the top per reference. Tubes are discolored near the connection points. 12. Bottom half of the gauntlet has 4 rectangular indentations on the inboard side near the seam.
Left gauntlet:
1. A keypad that is silver in color, appears at the wrist and weathered.
2. A greeblie detail, identical to or closely resembling the correct Glenross Dental Expander is mounted above the keypad that is painted to match reference.
3. A rocket is mounted to the top of the arm. The rocket is heavily weathered. The tip of rocket is silver, then copper with black holes (like whistling birds holes), then weathered silver.
4. A flame thrower housing is mounted on the outside of the arm, with an overall taper. The rear end matches up to the back edge of gauntlet, the front extends past the keypad.
5. The flamethrower has 2 knurled nozzles exposed at the wrist end.
2 black momentary style push-button switches are mounted to the top of the housing.
6. A short and round shape similar to an LED is present on the top back corner of the upper shell, next to the rocket. This is weathered for Cobb Vanth and give the appearance that it has been painted over.
7. Left upper gauntlet has two holes and a rounded rectangle in between.
Left gauntlet lower shell has a rectangular indent on the inboard side near the upper seam and the back of the gauntlet, the long side running parallel to the edge of the gauntlet. There is also an indentation pattern along the center of the bottom gauntlet shell. A large slot with 4 bars added, 3 the same size and one larger one at the bottom edge of the gauntlet. This results in what looks like 3 rectangle indentations with grooves down each side, the full length of the gauntlet.
8. Any padding used must not be visible.
Additional Images:
Gauntlet reference album: https://photos.app.goo.gl/xxXRQZLeEY6g9rMc6
Jetpack
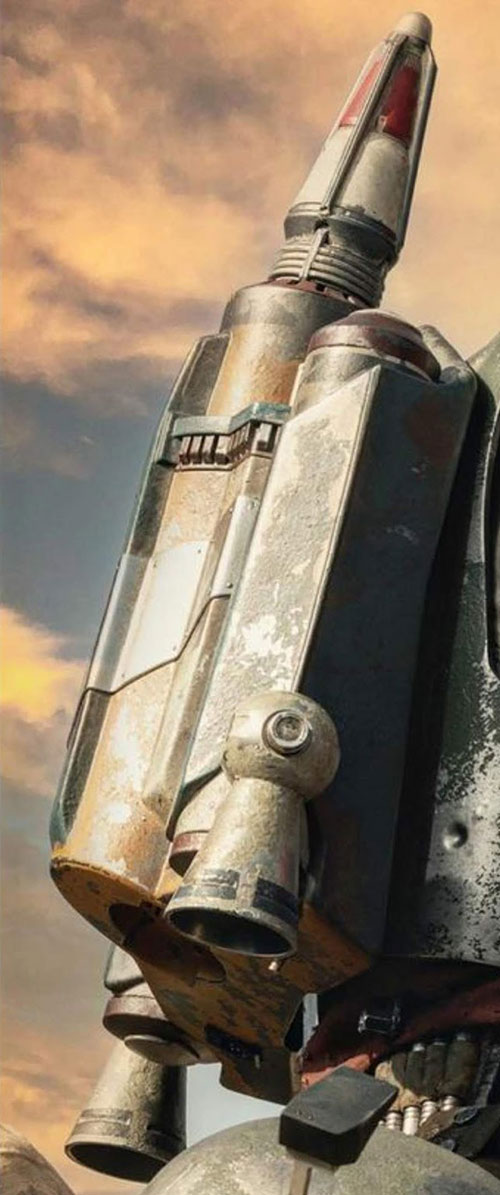
https://photos.app.goo.gl/Jz3fsG4reZ2Po2hG6
Required Details:
1. Traditional Z-6 Jetpack with a raised center tank and a fuel tank on either side of the center tank.
2. Main body of the jetpack is blue green, golden yellow (matching the shoulder armor), burgundy, white, and silver with extensive weathering matching reference photos.
3. Jetpack has a repair patch on the main center tank running upward left to right and contours to the jetpack’s surface.
4. There is the appearance of a rivet in each of the corners of each contoured repair patch panel. The right-most panel only has two rivets in the center top and bottom, close to the edge matching.
5. Jetpack has a center missile with collar and base. The missile is white, red, and silver with extensive weathering.
6. There is a two-directional thruster on each side of the jetpack that is off-white and weathered to show a metallic in appearance base with black detailing around the indents close to the bottom of each cone.
6. The bottom of the jetpack has a centered winged exhaust vent, audio plug on the left side, and silver push button on the right side.
7. There is a classic beacon and stabilizer on the flat section above the center tank with the beacon on the left side of the missile and the stabilizer on the right side.
8. “Piano keys” are present on each side of the center tank, stretching horizontally out to either side.
9. Jet pack sits snug and securely against the back armor with no loose connections.
Additional Images:
Jetpack reference album: https://photos.app.goo.gl/rTJPFC9LS7cbWT356
Optional Items:
KA74 Blaster Rifle
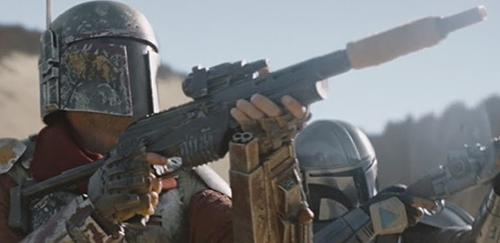
https://photos.app.goo.gl/pCbp5SQtQPQBYM1BA
Required Items:
1. Bulk of blaster rifle is based on PP-19-01 Vityaz submachine gun. Different front section and stock plus added scope – see reference.
2. Pistol grip and barrel have a tan fabric wrap per reference.
Additional Images:
Blaster rifle reference album: https://photos.app.goo.gl/MnyHWG3LkyMSo8Gs7
Krayt Dragon Detonator
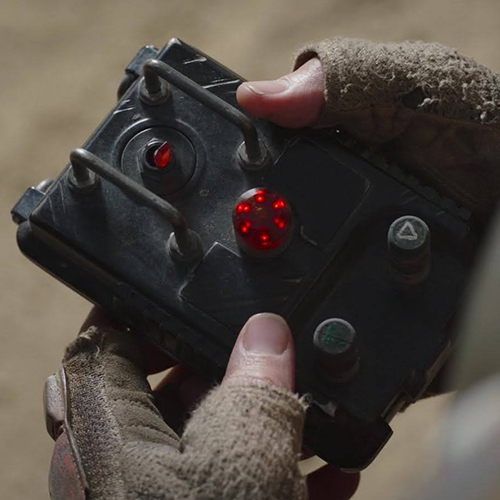
Required Items:
Based on a Honeywell M42G Remote Alarm
German Army – Bundeswehr
Honeywell ELAC M42G
NSN: 6665-12-187-5525
Light and sound signal.
Shockproof, waterproof and dustproof
External power supply 14.3V
Weight: 500g.
Military production from Germany.
Alterations required:
1. Remove bottom switch, fill hole.
2. Add a red toggle switch in the top hole.
3. Fill in Bund logo.
4. Grind off icons.
5. Remove top two rings
6. Add two thin plates on either side of the center light.
7. Side plates – 2 rectangular plates with ridges that do not stick out any farther than the central lip of the unit.
8. Plates are positioned away from the new switch.
9. Hero prop has 12-14 main ridges, the space between New top handle per reference shape using the original holes from the removed rings.
10. Add two switch guard rails with rounded 90 degree angles and a nut at each of the attachment points parallel to the unit, on each side of the new switch.
New top switch:
1. Toggle Switch, DPDT, .689″ Flatted Red Toggle, Red 2VDC LED, 6A, 125VAC, Solder
2. Original part two leads have inverted triangles painted onto the rubber covers. Looking at the unit, white inverted triangle on right side, green inverted triangle on the left.
3. Painted black and weathered with silver scrapes. Back panel is black.
Optional Details:
1. The metal rails may be black or aluminum colored (varies shot to shot – see reference).
2. The switch is an illuminated switch.
Additional Images:
Detonator reference album: https://photos.app.goo.gl/h48ubRUSosounssaA
Disclaimers:
Tattoos and body piercings – No tattoos or body piercings may be visible unless it is a tattoo/piercing the character has. They must be covered with makeup or by the costume.
PLEASE NOTE: The costume standards are a guide, yet are not an all inclusive outline of required elements. The judges will be looking for quality of workmanship, accurate execution and use of materials in addition to these general standards check lists. If you have a question about fabrics, colors, and parts choices for your build please contact the LCJs for your category about parts/materials you are considering before you start your build.