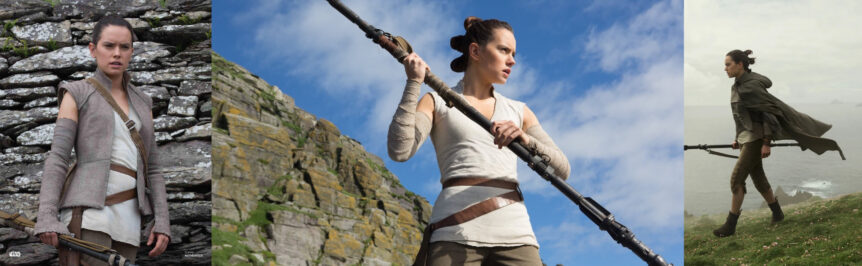
CHARACTER DESCRIPTION
Seemingly abandoned by her parents on Jakku, Rey grew up a scavenger amid the wreckage of war. Her life changed when she agreed to help a droid on an urgent mission for the Resistance. Rey discovered she was powerful in the Force, and sought out the vanished Jedi Master Luke Skywalker to train her. That ended in disappointment, as did her attempt to bring Kylo Ren back to the light. But the resilient Rey continued her training and learned the truth about her parentage and her mysterious connection with Kylo. She then faced her greatest test: a confrontation with fear and evil that would determine the galaxy’s fate.
(Source: https://www.starwars.com/databank/rey)
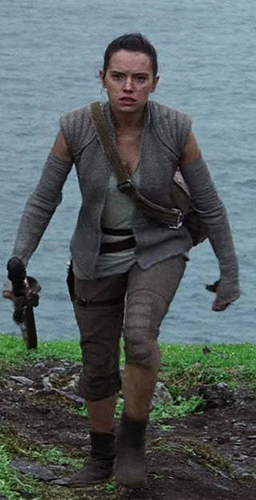

Front Image:
URL: https://drive.google.com/file/d/1XdAwEt … drive_link
Source: Vanity Fair
Back / Second View Image:
URL: https://drive.google.com/file/d/1ypbkFT … drive_link
Source: cap-that.com
Required Items:
Hair and Face:
Image URL: https://drive.google.com/file/d/1Ey_fEG … drive_link
Source: cap-that
Required Details:
1. Hair is a natural color (brown preferred).
2. Hair is secured in three neat looped buns running vertically down the back of the head.
3. A few thin strands of hair are loose around the face.
4. No tattoos are visible.
5. Wig is allowed, but must be high quality and look like real hair.
Optional Details:
1. Felt strips may be wrapped around the base of each looped bun to keep it tidy. Felt should closely match the hair in color.
2. Subtle “no-makeup” makeup may be worn.
3. Brown eye color contact lenses recommended, not required.
Additional Images:
URL: https://drive.google.com/file/d/1y0Lzym … drive_link
Source: cap-that.com
Shirt:
Image URL: https://drive.google.com/file/d/1iHRRtJ … drive_link
Source: cap-that.com
Required Details:
1. Ivory or cream sleeveless wrap shirt that goes past the vest hem to the bottom of the hips.
2. Shirt is made of a textured natural knit fabric (cotton pique recommended).
3. The shirt is self-lined. The unfinished edges of both layers are visible at the hem.
4. Shirt wraps right over left.
5. Shirt has a short, mandarin-style collar that is approximately 1.5 inches (5 cm) high (proportional to wearer.) The free edge of the collar is open blanket stitched in a thread that matches the shirt fabric.
6. The neckline and shoulder seams are open blanket stitched in a thread that matches the shirt fabric.
7. The shirt is not see-through.
Additional Images:
URL: https://drive.google.com/file/d/1He5qUl … drive_link
Source: cap-that.com
URL: https://drive.google.com/file/d/1eklijF … drive_link
Source: Kristen Jones
URL: https://drive.google.com/file/d/1mDvIsb … drive_link
Source: cap-that.com
Vest:
Image URL: https://drive.google.com/file/d/17sYOMc … sp=sharing
Source: Sarah Townsend
Required Details:
1. Neutral mid-tone gray or grayish-taupe vest that reaches to the top of the hips.
2. Vest is a heavy, herringbone textured woven fabric made of linen or wool. The herringbone pattern is oriented vertically on the vest.
3. Vest has a pad on each shoulder. Each pad is topstitched into five curved segments. The segments increase in size traveling from the outer edge of the shoulder in towards the collar.
4. Vest has a stand collar that is an extension of the bodice. There is no seam joining the collar to the bodice.
5. The collar and front opening of the vest are decorated with a closed blanket stitch. This stitching should be done in a heavy thread (embroidery floss recommended) that is either cream or a shade lighter than the vest.
6. A topstitched seam runs perpendicularly from top to bottom on both the right and left sides of the collar.
7. The raw edges of the seam are folded under and topstitched down, leaving a gap between either side of the seam.
8. The gap has visible ladder stitching using the same thread as the decorative blanket stitching.
9. There are two curved princess-style seams on the back of the vest. The top of the seam ends at the mid-back armhole, just below the shoulder pad detail. There are no princess seams on the front of the vest.
10. Back seams have the raw edges folded under and topstitched down on either side. The back seams have the same ladder stitching as the neck seam
11. Vest has a peplum style waist.
12. The bottom of the vest is visibly frayed.
Optional Details:
1. The herringbone on the shoulder pads is oriented horizontally, opposite to the rest of the vest.
2. Vest is lined. The front of the vest is lined with a suede or suede-like material. The main body of the vest is lined with a solid color broadcloth that closely matches the color of the vest.
Additional Images:
URL: https://drive.google.com/file/d/1V_-CdW … drive_link
Source: Sarah Townsend
URL: https://drive.google.com/file/d/1QTIlTF … drive_link
Souce: Kristen Jones
URL: https://drive.google.com/file/d/14KEBMz … drive_link
Source: Kristen Jones
Armwraps:
Image URL: https://drive.google.com/file/d/16Wi81i … drive_link
Source: Kristen Jones
Required Details:
1. Stretch textured crepe armwraps that extend from mid-bicep to below the top edge of the gauntlets. No skin is seen between the wraps and the gauntlets.
2. Armwraps are dyed a similar neutral mid-tone gray or grayish taupe as the vest and gauntlets.
3. The undertone of the armwraps matches the undertone of the vest and gauntlets.
4. The ends of the armwraps are tucked in at the top.
Gauntlets:
Image URL: https://drive.google.com/file/d/1U9b64c … drive_link
Source: Sarah Townsend
Required Details:
1. Gauntlets extend from the elbow to the knuckles, with the backs of the gauntlets curving upward so that the back of the elbow is completely covered.
2. Gauntlets are made of the same fabric as the vest.
3. The backs of the gauntlets have an attached pad that runs from the top of the elbow to approximately mid-forearm. The pad follows the overall shape of the gauntlet, with the top of the pad curving over the elbow and then tapering toward the wrist.
4. The pad is divided vertically into six topstitched segments of roughly equal height. The top segment is not flat at the top, but it follows the curve of the gauntlet up and over the elbow.
5. The gauntlet pads are topstitched around the outer edges.
6. There is a detailed section of fabric that extends from mid-forearm over the wrist to the middle of the back of the hand:
7. The detailing consists of a thin horizontal section of repeating geometric shapes, then a wider horizontal section of stylized six petal flowers, then another section of repeated geometric shapes.
8. The detail on this section may be achieved in a variety of ways. Options include openwork embroidery, traditional embroidery, linen crochet, inserting cotton lace dyed to match the gauntlet fabric, or punching a pattern in the fabric.
9. The edges of the gauntlets are scalloped at the knuckles. The scalloped edge is finished so as not to fray.
10. The top edge of the gauntlets has the same closed blanket stitch detail as the vest. Blanket stitch is in heavy thread that is either cream or one shade lighter than the vest fabric.
11. The inner seam of the gauntlets is finished with an alternating closed blanket stitch using the same thread as the rest of the stitching details.
Optional Details:
1. Gauntlets are lined in a suede or faux suede fabric.
Additional Images:
URL: https://drive.google.com/file/d/16AgouX … drive_link
Source: Sarah Townsend
URL: https://drive.google.com/file/d/1kcLN2O … drive_link
Source: cap-that.com
Belt:
Image URL: https://drive.google.com/file/d/1UYXh5G … drive_link
Source: Hollie Green
Required Details:
1. Medium neutral brown leather or leather-like belt. Belt is thick enough to support the weight of the holster without sagging or wrinkling.
2. Belt is heavily weathered, especially along the edges.
3. Belt is made of a single strip of leather or leather-like material that is approximately 3 inches (7.6 cm) wide (proportional to wearer).
4. Belt is one solid piece as it wraps around the left side of the waist. As the belt extends toward the right side of the body, it splits into two pieces.
5. The upper piece is larger than the lower piece by approximately 0.5 inches (1.3 cm)
6. The top section of the belt fits snugly at the natural waist. The bottom section drapes downward to rest over the hip.
7. Both top and bottom sections taper into narrow tails that are approximately 3/4 inch – 1 inch (2 cm – 2.5 cm) wide.
8. The opposite ends of the top and bottom sections each end in a set of metal D or rectangle rings. Hardware may be silver, gunmetal, or black in tone.
9. The metal rings are secured to the leather of the belt with a stitched “X” in a thread color that closely matches or is slightly lighter than the belt color.
10. Each belt section has two sets of narrow oblong slits punched or cut into the area that wrap around the back. The height of the slits should be approximately the same as the width of the belt tails. The slits are centered on the width of the belt.
11. The belt is secured by threading the belt tails through both metal rings. The tails turn back on themselves and pass through the top ring only. The ends are secured by weaving them in and out of the slits.
12. A section of twine wraps around the solid portion of the belt and extends to wrap around the bottom belt a few times. This is one continuous piece of twine. The twine can be a range of natural colors in the tan or taupe color families.
Additional images:
13. There is a second twine wrap on the back lower belt.
URL:https://drive.google.com/file/d/1SikrZk … drive_link
Source: cap-that.com
URL: https://drive.google.com/file/d/1sDaA6I … drive_link
Source: cap-that.com
URL: https://drive.google.com/file/d/1xFcTJE … drive_link
Source: cap-that.com
URL: https://drive.google.com/file/d/1qzIAzz … drive_link
Source: cap-that.com
Holster:
Image URL: https://drive.google.com/file/d/1Gr70wg … drive_link
Source: cap-that.com
Required Details:
1. Medium to dark brown leather or leather-like holster. The holster must support the weight of the blaster without sagging.
2. Holster attaches to the lower belt segment on the right hip.
3. Top of the holster is elongated and narrower than the main body. It loops over the lower belt. This loop is secured with two rivets or Chicago screws. The free edge of the loop is not visible from the front.
4. The left (viewer’s left) side of the holster is taller than the right and is a convex curve moving toward the center line of the holster.
5. The right (viewer’s right) side of the holster is a concave curve.
6. The right side overlaps the left in roughly the center of the holster. The overlap has a squared-off end.
7. A narrow (approximately 1 inch, 2.5 cm) retention strap bisects the bottom opening of the holster and ends on top of the overlapped sections of the main holster. The strap end is not flush with the top front edge of the holster, but ends slightly below it.
8. These three sections are secured together with two vertically oriented rivets or Chicago screws.
9. The holster has a thigh strap made of the same color leather.
10. The strap is approximately 3/4 inch (1.9 cm) wide (proportional to wearer) and wraps around the mid-thigh parallel to the ground.
11. One end of the strap ends in two rectangle rings. This end is secured with a small stitched “x” in a similar color to the leather.
12. The strap is secured by passing it through both rectangle rings, then doubling it back on itself and passing it through only one ring.
13. The long tail of the strap is secured with a button stud.
Optional Details:
1. Saddle stitching (by machine or hand) along the outer edges of the holster.
2. Saddle stitching thread color is similar to the leather.
Additional Images:
URL: https://drive.google.com/file/d/1ou_CL0 … drive_link
Source: Kristen Jones
Pants:
Image URL: https://drive.google.com/file/d/1TODda- … drive_link
Source: Jenna Hunt Blackledge
Required Details:
1. Dark green or light brown stretch suede or suede-like pants. Due to differences in lighting and filters, the pants’ color may fall within a range of muted brown to greenish brown to gray/taupe.
2. Pants are closely fitted and end just below the knee.
3. The hem is finished.
4. There is a vent or slit at the hem of the outer side seam of each leg. The top of the vent lines up with the center line of stitching on the kneepads.
5. Pants have no visible closure or pockets.
6. Pants have knee pads that begin approximately 2 inches (5 cm) above the knee and end just below the knee. Knee pads are proportional to the wearer.
7. Knee pads are rectangular with blunted corners.
8. Within the knee pads are five smaller quilted pads that are roughly hexagonal in shape, but with blunted corners.
9. The five smaller pads are spaced equally from top to bottom.
10. Knee pads have a topstitched edge.
11. Pants have a visibly raised horizontal seam or pintuck approximately 1 inch (2.5 cm) above the kneepads. Seam/pintuck is whipstitched in a matching thread color.
Optional Details:
1. Inner and outer leg seams are whipstitched in a matching thread color.
Additional Images:
URL:https://drive.google.com/file/d/1swqhp2 … drive_link
Source: Kristen Jones
Boots:
Image URL: https://drive.google.com/file/d/19shQ1P … drive_link
Source: cap-that.com
Required Details:
1. Short heavyweight felt-textured fabric (wool recommended) boots with leather or leather-like accents. Boots end above the ankle but below mid-calf.
The textured fabric is dark brown with flecks of gray and taupe. The leather or leather-like fabric is a matte/non-shiny dark brown.
2. Boots are a pull-on clamshell style that lace up the back to fit securely. There are no other closures visible on the boots.
3. There are two loops made of the leather on each side of the back of the boot, plus a single loop on the back center of the boot (5 loops total per boot). A long dark brown cord laces through these to secure the boot. The ends of the laces are tucked into the boots.
4. Soles of the boots are a lighter tan/taupe than the body.
5. If the boot has a brand tag on it, the tag must be removed.
Additional Images:
URL: https://drive.google.com/file/d/1yOOcn1 … drive_link
Source: Cap-that.com
URL: https://drive.google.com/file/d/169onJ9 … drive_link
Source: Sarah Townsend
Lightsaber:
Image URL: https://drive.google.com/file/d/18Ioazm … drive_link
Source: Wookiepedia
Required Details:
1. Silver lightsaber hilt with black vertical grips on the pommel.
2. D-ring attached to the pommel end.
3. Lightsaber has a vertical ignition switch that is light gold or brass-toned metal on top of the control box.
4. One (1) raised red button close to the emitter/blade portion of the hilt.
5. Emitter end has two convex “fins” on the opposite side of the hilt from the button.
6. Luke’s hilt from The Empire Strikes Back is an acceptable version.
7. Lightsaber may be bladed or a static hilt (no blade).
10. Ultimate FX short sabers or other toy sabers are not acceptable.
Optional Details:
1. Attached blade(s), LED lights, and sound effects, are allowed but not required.
2. If bladed, must be blue.
Additional Images:
URL: https://drive.google.com/file/d/1K1DDA4 … drive_link
Source: cap-that.com
Optional Items:
Blaster:
Image URL: https://drive.google.com/file/d/1o9PtGg … sp=sharing
Source: Wookiepedia
Required Details:
1. The NN-14 blaster is silver in color, with dirt and grim weathering.
2. It has two barrels, the main barrel about four times as long and twice as large as the secondary barrel.
3. Main barrel has a chrome-blue fouling at the end, given by the heat given off by lasers, and eight holes on each side. Barrel is around 3.5 inches (9 cm) with a 1 inch (2.5 cm) diameter.
4. Body of the blaster is square on the side, with a rectangular cross-section with rounded edges; each side has four screws enclosing a rectangular panel, a black square, and six engraved lines, one corresponding to the square and five in a single cluster. Body is around 4 inches (10 cm) by 4 inches (10 cm) by 1 inch (2.5 cm).
5. The silver handle has a black grip on each side attached by two screws each.
Optional Details:
1. Blue flashing at end of emitter nozzle.
Additional Images:
URL: https://drive.google.com/file/d/1CsJ0KP … drive_link
Source: Jenna Hunt Blackledge
Staff:
Image URL: https://drive.google.com/file/d/18uz5ti … drive_link
Source: Cap-that.com
Required Details:
1. The staff is approximately 6 inches (15.2 cm) taller than the wielder.
2. The staff is dark brown or black with heavy, textured weathering in rust tones.
3. If the staff is 3D printed, print lines must not be visible.
4. The staff is assembled from differently shaped greeblies. From top to bottom, the order and general description of the greeblies is as follows:
5. A half-dome greeblie with horizontal ridges.
6. A conical greeblie with vertical ridges. The base of the cone points toward the bottom of the staff.
7. A cylindrical greeblie with a wide rounded top and slightly flared base. There are two flat inset pieces on opposite sides of the greeblie. These pieces are oriented vertically.
8. A flat round cog.
9. A second conical ridged greeblie that is slightly shorter than the first conical greeblie. The base of the cone points toward the top of the staff.
10. A second flat round cog.
11. A tri-fin greeblie with a tapered bottom.
12. A cylindrical greeblie with horizontally oriented ridges. The ridges are fairly prominent and rounded, similar to a tightly wrapped rounded cord or wire.
13. A short cylindrical greeblie with vertically oriented ridges.
14. A long greeblie with a slight indent approximately 1 inch (2.5 cm) from the bottom. The greeblie has a grid-style texture. The texture is fairly low-profile.
15. A short (approximately 1 inch, 2.5 cm) cylindrical greeblie with the same texture as the above greeblie. The length of this greeblie is approximately the same as the length from the indent to the bottom of the above greeblie.
16. A second cylindrical greeblie with horizontally oriented round ridges.
17. A short bulbous greeblie that tapers at the bottom.
18. A third conical ridged greeblie that is the same size as the first. The base of the cone points toward the top of the staff.
19. A second half-dome greeblie with horizontal ridges.
20. The middle of the staff is wrapped with fabric and leather. The fabric is an ivory, cream, or natural-toned woven fabric. The leather is medium brown in tone and should be thin enough to wrap easily around the staff. Fabric and leather are also weathered.
21. Staff has a carrying strap made of heavyweight, tan/light brown webbing. The strap is similar to a British Enfield rifle sling.
22. Strap has a metal tri glide slider to adjust the length.
23. Each end of the strap finishes in a brass-tone metal swivel lobster clasp.
24. Staff has two H-shaped leather or leather-like slings that are secured with snaps. The slings are roughly “H” shaped, with the two longer parallel lines ending in a set of silver-tone snaps (2 snap sets total per sling). The crossbar of the “H” has a metal D-ring. The metal clasps of the webbing strap attach to the d-ring.
25. The H-shaped slings are brown with heavy weathering.
Additional Images:
URL: https://drive.google.com/file/d/1CmRvBl … sp=sharing
Source: cap-that.com
Crossbody Satchel:
Image URL: https://drive.google.com/file/d/1ZHe1MV … drive_link
Source: Cap-that.com
Required Details:
1. Rectangular canvas crossbody satchel in faded olive green or brownish-green heavy woven fabric. Natural fabrics preferred.
2. Satchel has a flap top opening.
3. There is a strip of darker brown webbing that is approximately 1.5 inches (3.8 cm) wide that runs vertically down the flap. The webbing strip is offset to the left of center.
4. At the bottom end of the webbing strip there is one half of a gunmetal or black metal quick release buckle.
5. The matching buckle piece is attached to the bottom of the bag body.
6. The front body of the bag has mesh/netting across the bottom half to form a pocket. Webbing is slightly darker than the body of the bag.
7. The satchel strap is comprised of a brownish olive strip of webbing that has been sewn to a slightly wider strip of the bag material.
8. The strap has a silver metal triglide.
9. All seams are exposed and visibly fraying.
Additional Images:
URL: https://drive.google.com/file/d/1u7H4oH … drive_link
Source: cap-that.com
Poncho:
Image URL: https://drive.google.com/file/d/19shQ1P … drive_link
Source: cap-that.com
Required Details:
1. Medium tone gray woven poncho (cotton preferred).
2. Poncho ends just above the shirt hem in the front, and falls to the tops of the boots in back.
3. Poncho has a wrap-style closure with no visible snaps, buttons, or other means of securing it.
4. Poncho front wraps right over left.
5. Poncho has a large attached self-lined hood.
6. When worn down, the hood falls to the shoulder blades.
7. The hood is rounded in shape, not pointed.
8. There is a box pleat in the center of the hood where it attaches to the main body of the poncho.
9. Poncho has a center back seam.
Additional Images:
URL: https://drive.google.com/file/d/1PPZBJF … drive_link
Source: Jenna Hunt Blackledge
URL: https://drive.google.com/file/d/11H37wd … drive_link
Source: Jenna Hunt Blackledge
Alternate Configurations Training:
– Hair and Face
– Shirt
– Armwraps (see below)
– Belt
– Holster
– Pants
– Boots
Minimum of one (1) Optional item required for approval from list below:
– Lightsaber
– Staff
Armwraps:
Image URL: https://drive.google.com/file/d/1ayQlRf … drive_link
Required Details:
1. Cream or natural ivory stretch textured armwraps with weathered edges.
2. Armwraps reach from mid-bicep to wrist.
3. Armwraps fit snugly to the arm.
4. Ends of the wraps are tucked in so as not to be seen.
Alternate Configurations Cave vision:
– Hair and Face (see below)
– Shirt
– Vest
– Armwraps
– Bracer (see below)
– Belt
– Holster
– Pants
– Boots
Hair:
Image URL:
Source:https://drive.google.com/file/d/1qBZXvb … drive_link
Required Details:
1. Hair is approximately shoulder length with small pony tail at top of the head (two small wraps 2 inches apart preferred).
2. No bangs.
3. Naturally occurring hair colors only (brown preferred).
Additional Images:
Image URL:
https://drive.google.com/file/d/1FqMtLd … drive_link
Source: cap-that.com
Bracer:
Image URL: https://drive.google.com/file/d/1dNwyLM … drive_link
Source: cap-that.com
Required Details:
1. Leather or leather-like dark brown bracer.
2. The top edge of the bracer is roughly trapezoidal in shape and is approximately 4 – 5 inches (10 – 12.5 cm) wide at the widest point.
3. The tail of the bracer weaves through two slits on the main body and then turns back on itself.
4. The visible surface of this reversed section is a lighter brown or tan color.
5. The reversed section continues around the wrist through a second set of slits, and the end of the tail is secured in a third set of slits.
Additional Images:
Image URL: https://drive.google.com/file/d/1v1R6rC … drive_link
Source: cap-that.com
Costume Resources: Reference Photo Gallery – https://drive.google.com/drive/folders/ … drive_link
Author: Pamelibrarian
Updated: February 6th 2026
PLEASE NOTE: The costume standards are a guide, yet are not an all inclusive outline of required elements. The judges will be looking for quality of workmanship, accurate execution and use of materials in addition to these general standards check lists. If you have a question about fabrics, colours, and parts choices for your build please contact the Detachment Officer for your category about parts/materials you are considering before you start your build, or post a ‘Work in Progress’ (WIP) thread on the forum.